
Proper vehicle maintenance can save you a lot of time and money, though proper brake maintenance in particular could very well save your life. This appears to be common sense, yet why do so many vehicle owners put it off? To anyone who has never done it before, brake servicing might appear too complicated or time consuming. Staying on top of the maintenance of your brakes and understanding the details of your brake system is easier than you might think, and can save you from potential future repairs.
Text and Photos by Cameron Parsons
DSPORT Issue #172
What’s the Problem?
Nearly every maintenance practice for the brake system revolves around treating symptoms of friction and heat. Pads at each wheel rely on a surface area of only a few square inches to clamp down on rotors to stop vehicles that weigh thousands of pounds. This task asks a lot out of such small components, generating extremely high temperatures in the process. To this end, pads and rotors can experience temperatures exceeding 1,000-degrees Fahrenheit. The surrounding components like calipers, lines and the fluid that fills them absorb this heat as well. These temperatures are more than enough to warp metals, turn strong materials brittle and boil fluids. Learning to identify signs of wear in the components will put you a step ahead in maintaining stopping power.
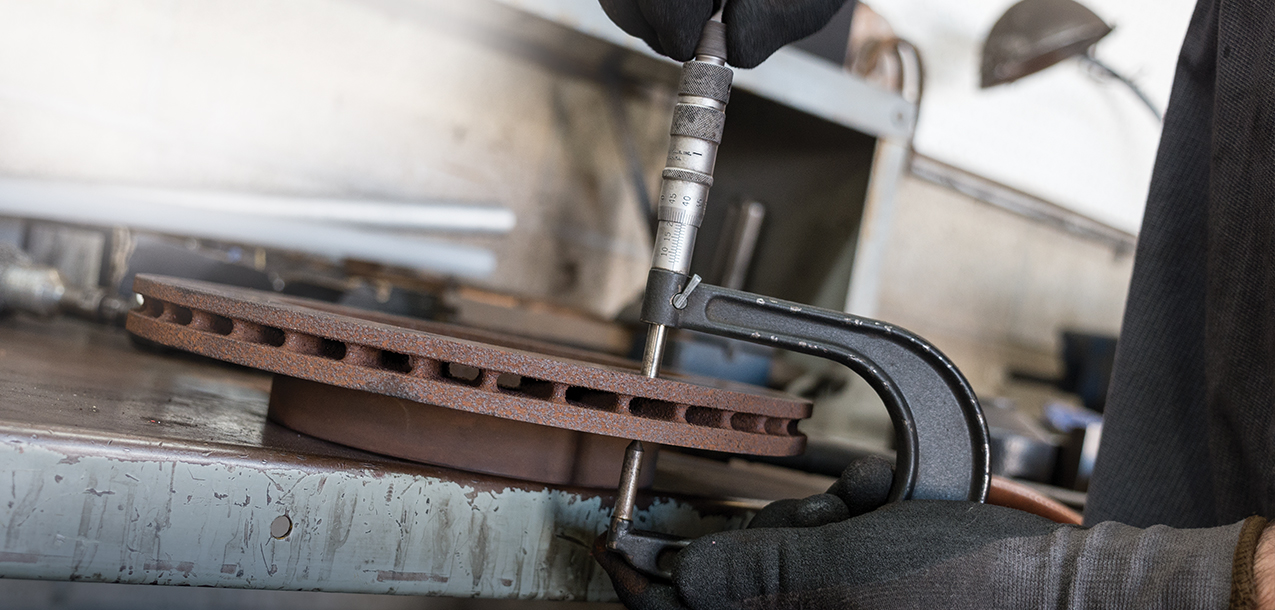
 Always examine your brake pads when replacing them. Signs of glazing, cracks or uneven wear can tell the effectiveness and condition of your brake system.
Pads
Starting with the most commonly changed component, a simple inspection of the pads can tell you a lot. Typically, the pads should wear evenly over time and when only a few millimeters of friction material remain, you should swap in a new set. However, you may come across some unique problems upon inspection. Used brake pads can appear extra reflective on the face of the friction material, almost like it is covered in a sugary glaze like a donut. This may also come with the appearance of cracks developed throughout the friction material, as a result of the material turning brittle. These signs attribute directly to the effects of heat. Improperly bedding pads, working the brakes too hard for extended periods, or seized components in the caliper that rest the pad against the rotor can lead to this problem. Although less common, pads can appear to wear unevenly. This is sometimes due to a problem with the caliper piston not returning into the proper resting position when the brakes are disengaged.

Rotors
Since the pads clamp down against the rotors, many of the problems you might find in brake pads are reflected in the state of the rotors. The rotors, or discs, wear out and get thinner over time. Beyond having material for the pads to clamp down on, rotors rely on their thickness and design as a heatsink to dissipate heat that comes from kinetic energy being converted into thermal energy. When the rotors wear down to a certain thickness, specified by the manufacturer, it is highly recommended to replace them. Like brake pads, rotors are highly susceptible to heat damage, often shown by glazing or cracks. They can experience thickness variations, often due to pad material fusing to the rotor, which may not always be visible to the eye but can be felt in the steering wheel and pedals. If the brake pedal shudders and the steering wheel shakes when you apply the brakes, there’s a good chance the rotor surface has been made uneven. If a rotor experiences this or takes surface damage, it may still be reusable if you have it turned or resurfaced. This process scrapes a tiny layer off the rotor’s surface to return it to its ideal flat and smooth finish. As long as this doesn’t take the rotor beyond its minimum thickness, turning it can extend its usable life significantly.
Calipers
 Although brake calipers don’t experience high amounts of friction like the pads and rotors, the calipers still can wear over time or lose functionality. The heat generated by the pads and rotors will transfer through any points of contact, indirectly heating other brake components like the calipers, lines and fluid. The repetitive heating and cooling can expand and contract the metals, particularly the pistons that are meant to slide back and forth inside the caliper. Excessive heat or lodged particles (usually due to damaged seals) can cause the pistons to press the pads against the rotors unevenly, or seize in place completely. A seized piston should always be addressed immediately, as this can cause the pad to sit against the rotor and generate very high temperatures. This can spread to not only damage the brake components, but the wheel bearing and other potential areas as well.
Hoses
From the brake master cylinder to each of the four wheels, most of the lines are made up of metal tubing, referred to as hard lines. However, you’ll find that most Although the rubber lines allow for flexibility to move with the wheels and calipers, their construction is vulnerable to cuts, nicks and tears caused by rocks or other debris. Over time, the rubber will dry, become brittle and crack. Many car owners might attest to using the same rubber lines for 20 years or more, however, these lines are designed to be replaced on average every ten to fifteen years. These problems are not difficult to detect, and replacement is one of the simpler tasks in brake maintenance. If you want to save yourself some work in the future, steel-braided brake lines endure much longer than rubber lines and come with the benefit of improved brake feel.
One Affects the Other
Typically, problems in one component of the braking system will affect others. A seized piston may press the brake pad unevenly against the rotor, causing poor wear and high temperatures. Improperly bedded pads or using too aggressive of a pad compound can lead to heavy unwanted wear on the rotor. If any one piece shows a sign of trouble, check the related components to find the symptoms and isolate the problem.

Fluid
Like with brake lines, many owners overlook proper brake fluid maintenance, usually recalling the idea “if it ain’t broke, don’t fix it.” The problem is that most owners don’t know that their brake fluid is contaminated until they go about replacing it. Since brake fluid will typically become contaminated with moisture and other materials slowly over a long period of time, most owners can’t pinpoint any time when the fluid exceeded its useful life. Although minimal, water enters the brake system through exposure to air, past seals and through microscopic pores in hoses. Given that water boils at much lower temperatures than brake fluid, its presence can introduce vapors into the brake system with only mild use. Vapors in the system would compress with much less pressure than it takes to compress fluid, making the pedal feel mushy and less effective for slowing down.

Brake fluid should be mostly transparent. If it carries a dark shade of brown or black, you are likely overdue to flush out the system. Most manufacturers recommend a specific interval period between brake fluid replacement, so go by their suggestion first. Otherwise, owners should check the brake fluid regularly and replace it every four to five years. The Basics Although the many generations, makes and models of cars on the road are built so differently, brake systems are consistently very similar on most applications. Generally, you should always refer to the service manual for advice on how to maintain your car specifically. However, there are a few common practices that can save you some headaches during the process.
Changing Pads
Any time that you remove the wheels from your car, always use this opportunity to check the status of your brake pads, even if it’s a shorter interval than the suggested servicing time. When it is time to change pads, you’ll find it much easier and cleaner to follow the steps in the proper order and utilize the right tools. With the brake pads off, inspect the calipers and lines for any wear damage or leaks. If everything looks good, loosen the brake master cylinder cap before installing the new pads. Many car owners and mechanics will use a C-clamp to compress the caliper pistons to make room for the new pads. However, some caliper designs don’t allow a C-clamp to fit properly to do this. Even worse, if you can’t place a C-clamp on the center of the piston as you compress it, you run the risk of lodging it sideways. To resolve this, some tool manufacturers offer a specialty brake spreading tool that allows users to compress the caliper piston smooth and straight, making room for the new pads to go in.
 Coefficient of Friction

When discussing brake pads, you’ve likely heard the term “coefficient of friction.” This refers to the stopping force of the pad. More specifically, it is the force required to slide a body across a surface divided by the weight of the body. The smaller the force required for the body to slide, the smaller the coefficient of friction. The greater the force required for the body to slide, the greater the coefficient of friction.
Bedding Brakes
Following the installation of new pads or rotors, the new hardware should be bedded in properly. This process can vary, depending on who you ask. At its core, bedding in new pads and rotors is meant to transfer a layer of material from the pads to the rotors. This ensures smoother and more consistent braking. Like with other components, we first recommend bedding in new hardware as per the manufacturer recommendation. Otherwise, a series of 10 or more medium-to-aggressive braking applications from 45 MPH or faster, without coming to a complete stop, should suffice. This brings up the temperatures and distributes pad material onto the rotor over the course of multiple braking sessions, as opposed to overwhelming new components with high friction and temperatures on the freeway or racetrack.
Bleeding Brake Fluid
One of the most important brake maintenance practices, bleeding brake fluid or replacing it altogether, is much easier with a friend. Each brake caliper has a bleeder screw, usually covered by a rubber cap, that you can loosen to release the brake fluid. From here, someone needs to press on the brake pedal to pressurize the system and force the fluid out. Brake fluid is highly corrosive and can damage paint, so make sure to run a hose from the bleeder screw to a catch bottle to avoid any mess.

Performing maintenance or installing upgrades to the braking system can often introduce air into the system. Any time you make significant changes, you should bleed the fluid to purge out any air.
When filling and bleeding the brake fluid, ensure that the master cylinder is full and that all of the bleeder screws are closed. One person then presses and releases the brake pedal multiple times to build pressure in the system, and then holds the pedal to keep the brakes engaged. At this point, the other person opens the bleeder screw to let any air of the system out through a clear hose and into the catch bottle. Examining the fluid as it leaves the caliper will reveal pockets of air in the system. Once the pressure is relieved and fluid stops flowing out, the brake pedal can be released and the process can repeat until there are no more air pockets visible. Any time that fluid left the brake system, double check that the master cylinder is full, or else you run the risk of sucking air back into the lines instead of fluid. This procedure must be performed at each individual wheel, starting with the caliper furthest from the master cylinder first, followed by the next furthest until the last caliper which should be the closest. Bleeding brakes can feel like a tedious job, but a thorough process of eliminating all of the air in the system will ensure constant and consistent working brakes.

Having your brake rotors turned can greatly extend their lifespan at a low cost.
Time for Change
Many mechanics and shops like to scare potential customers out of doing jobs themselves. However, take some time to do a little research and acquire a service manual, and you’ll find that most maintenance items are simpler than you’d expect. The braking system serves as one of the most important set of components on your vehicle in terms of safety, yet proper maintenance can be done in your home garage with a basic set of tools and the proper know-how.