
2000 Honda S2000 Polyurethane Bushings Install
 In Issue #170 of DSPORT Magazine, we upgraded our project 2016 Mazda MX-5 from factory rubber suspension bushings to Energy Suspension’s Hyper-Flex polyurethane bushings. Although the car was new and the stock bushings were in perfect condition, we still discovered significantly improved lap times along with better driving characteristics. These benefits are only exaggerated when upgrading heavily aged cars to polyurethane bushings. Our D’Garage project S2000 had stacked up 366,000 miles on the chassis, still running on the factory rubber. As a result, the car inhibited unwanted driving characteristics and even a level of unpredictability through corners. We decided to cure this and take the car over to Energy Suspension, where we looked at some of the highlight points in how to replace the bushings on the suspension, sway bars, steering rack, and differential mounts.
Text and Photos by Cameron Parsons // Install by Energy Suspension
Before getting started, always make sure that the car is safely lifted at secure lift points. If you’re doing this at home, be patient and take your time, as bushing replacement may not be difficult but it is time consuming.

Order of Operations
The S2000’s suspension arms can mostly be removed and installed independent of other suspension components. Because of this, you’ll find it much more convenient to replace the bushings on one component at a time. To this end, we started at the rear end by removing the upper control arm, and then worked our way to the bottom. The front and rear suspension configurations are similar to each other, so you’ll find that many of the same steps carry over from the rear to the front of the car.

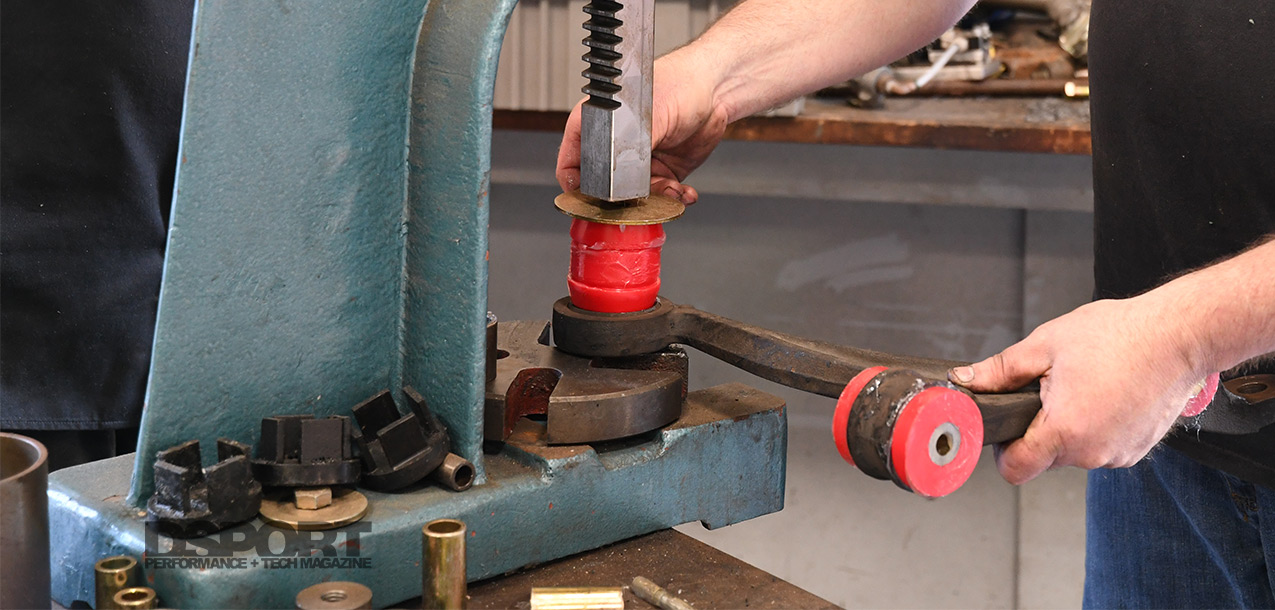
 When replacing bushings, a press is your best friend. Hydraulic and pneumatic presses are preferred when available, but many home garages will likely make use of arbor presses to do the job. This method usually requires some creativity with using or rigging up collars to press out the factory bushings. When applying pressure, ensure that the bushing is being pressed out straight so that it does not bind up and cause damage. Once the old bushing is out, clean the inside surface so that the new bushings fit in smoothly.
 The polyurethane bushings are notably more rigid, so a liberal amount of grease is recommended for installation. This will also help prevent unwanted squeaks in the future.

 Once greased, the Energy Suspension bushings can be pressed in with an arbor press, followed by the metal sleeve (also greased) that fits inside.
 The engineers at Energy Suspension recommend also greasing the mounting points to reduce noise and wear.
 With the arm back in place and mounted, you can then move onto the next control arm.
 Before removing any suspension components that set your car’s alignment, mark their positions in order to maintain your settings.

 The camber arm is simpler than other components as it only has two attachment points and just one bushing to replace. Like the other components, a press is used to push out the existing bushing. Then clean the inside surface to prepare for polyurethane replacement.

 Some components, like the rear camber arm, use split bushings that must be inserted from both sides. After both halves are installed, the metal sleeve can then be pressed in.
 The lower A-arms requires some extra work, as some of their bushings require different methods of removal.

 Some of the factory bushings use a shell that first needs to be hammered around the outside lip to loosen it up. Once loose, it can be knocked out to clear a path for the other half to be pressed or hammered out.
 Avoid long swings with the hammer for very hard hits. The bushings should work themselves out as long as you hammer them out straight and centered.
 This arm also contains a bushing that must be “burned” out. Although the term “burn” is commonly used, you should only heat the area around the bushing. Use a burner or torch that disperses a wide flame to better distribute heat and break the bonds that hold the bushing in place. Normally, the rubber does not require a direct flame for removal. Once the bonds are melted loose, a screwdriver can be used to twist and remove the bushing.
With the bushing removed, use a soft metal brush to clean the inside surface and remove any stray rubber particles.


In some cases, you’ll find that heavily aged bushings can be removed without the need for a press or a torch. In this case, we were able to clamp on the center metal insert with a vise and twist the control arm to break the rubber loose. We then cut out the remnants of the bushing inside and used emory cloth to smooth out the surface. This bushing location has a small lip around the diameter of the opening, so use a deburring tool to smooth the edge for a smoother installation.

Some of the larger bushings also have a larger surface area to press down on. In this case, you may want to use a washer or flat piece of metal to ensure that you press the bushing in evenly and centered.


 The differential mount bushings are composed of rubber filled with fluids. These bushings must be burned out, so you must first drill a hole into the rubber and drain the fluid before exposing them to high heat.


Once the rubber is burned out, deburr the outside edges and use memory cloth to smooth the inside surface.
 Once the parts are fully cleaned and the polyurethane bushings are greased, the new hardware can be pressed in and installed.


The steering rack bushings can be replaced without having to fully remove the rack. However, you will need to make enough clearance to lift the rack about an inch to insert the new bushings. The factory bushings can be pressed out with a washer, nut, and short metal tube (with enough room to receive the old bushing) on one end, and a washer and bolt on the other. Tightening the nut and bolt will press the bushing out and make room for the new one to go in.


 Energy Suspension’s sway bar bushings fit underneath the factory mounting brackets. Therefore, all you need to do is remove the sway bar brackets, locate the split in the factory bushing to spread it apart and remove it, then install the polyurethane pushing in the same manner.
Almost Done
Once all the pieces are reinstalled and in place, you still aren’t done yet. Always do a double check that no bolts are missing, and that every component is torqued to spec. It is also strongly recommended that you re-torque each of the components after 500 miles. After this final step, you can then take the car on the street or on the track with greater confidence and the better response that results from polyurethane bushings.
