
You think throwing a rod while driving on the freeway is scary? Imagine complete engine failure 30,000 feet above ground in an airplane. While you let that frightening visual sink in, know that the Federal Aviation Administration (FAA) enforces some of the strictest regulations on aircraft repair and maintenance. So what’s that have to do with automotive tech and performance? Many of the demanding procedures laid out by the FAA on the care of aircraft engines can be directly applied to the care of your street or track car.
Text and Photos by Sami Sharaf
DSPORT Issue #169
 The Inside Scoop

One of the simplest and easiest techniques widely adopted by the aviation community is the regular analysis of used engine oil and oil filters. In addition to sending oil samples to analysis laboratories to run tests a er every oil change, aircraft mechanics carry out an inspection of the used oil filter. To inspect the macroscopic contaminants trapped in the oil filter, a specialized filter-cutting tool is used.
The Goodson Oil Filter Inspection Tool (Part# FIT-1-G) easily cuts open oil filters ranging in diameter from 2.5- to 6.5-inches. The Oil Filter Inspection Tool is constructed from a solid piece of aluminum then anodized green for durability. The cutting mechanism features a replaceable steel cutting wheel that minimizes the amount of debris created while cutting through oil filter bodies. Some people may be tempted to use other generic cutting tools, but we’ll save you the trouble and let you know that’s a very bad idea. Hacksaws and other means of cutting generally introduce metal shavings and foreign particles into the oil filter, which will render your analysis worthless. In this scenario, sticking with specialty tools is very worthwhile.
A Closer Look
To really see what may be trapped inside the filter media, you’ll want to remove the paper filter element from the center tube. We found that the best method to separate the paper media from the center tube is to use a very sharp razor blade. Slice the media away and lay it out onto a clean surface. You can then spread the pleats apart and look for any contaminants.

Oil Filtration
The main responsibility of the oil filter is to trap contaminants suspended in the engine oil as it flows through the filter. This is accomplished by the paper filter medium in the filter body. Most filter mediums are sheets of porous microscopic cellulose fibers with a matrix of synthetic glass and polyester fibers. The media typically allows the passage of some very small (less than 5 microns) particles but traps larger particles (5 to 20 microns). To maximize the filtering ability and efficiency of the oil filter, adding pleats to the media sheet increases the total surface area of the filter media. The number of pleats is determined by the medium’s thickness and the flow characteristics desired of the oil filter. All of the other components in an oil filter facilitate the flow into the filter, through the media and out of the filter without cross contaminating filtered oil with unfiltered oil.
 Paper filter media inside oil filters feature pleats that increase the total surface area to maximize the filter’s contaminant-catching
Things to Look For
Once you’ve cut open your oil filter, you’ll want to disassemble all of the pieces of the filter to access the paper filter media. In a clean environment, you can pull apart the filter medium to see what (if any) has been trapped in the pleats.
How to Use:
After removing the oil filter from the engine and draining the used oil from filter,
1) Place the oil filter’s center hole onto the stud of the Oil Filter Inspection Tool.
2) Tighten the oil filter against the cutting blade without overtightening as this will dent the filter body.
3) Turn the Oil Filter Inspection Tool around the oil filter.
4) Repeat steps 2 and 3 until the cutting blade has cut through the filter body
5) Pull all the pieces out of the filter body to begin inspection of the paper filter media.


Ferrous Metals
Iron or steel particles are easily identifiable because they are magnetic (run a small magnet across the particles to verify if they are ferrous). Iron or steel contaminants can originate from cylinder walls, camshaft lobes or even the crankshaft. The abnormal wear or breakage of these parts will likely send pieces into the engine oil and subsequently into the oil filter. Depending on the size of the pieces and the condition of the engine, you may want to inspect those components sooner than later.

Non-Ferrous Metals
Many of today’s engines utilize lightweight aluminum components so pinpointing the origins of shiny aluminum particles found in the oil filter can be difficult. One area that experiences regular wear is the piston skirt. This can usually be verified during the breakdown of the engine’s rotating assembly. Generally, abnormal wear of the piston skirts is due to contamination that has entered the combustion chamber or the use of the wrong engine oil. Checking the engine’s air intake and filter system is a good idea if you believe contamination has entered the engine.

Other small, shiny particles that can be confused with aluminum are tin, lead or copper. These materials are often used in the Babbitt alloy layer of the main and rod bearings. Insufficient lubrication of these bearings can lead to the premature wear of the Babbitt layer and eventually to the failure of the bearing. If remnants of tin, lead or copper are found, it would be wise to ensure that the engine is being properly lubricated.

Non-Metallic Materials
In many cases, you’ll find some amount of carbon, which is somewhat difficult to identify, but the use of a magnifying lens can help. When rubbing carbon between your fingertips it will feel slightly gritty but will break apart easily. Carbon accumulation is typically a result of blow-by getting past the piston rings. If your engine suffers from excessive oil consumption and low cylinder compression readings, then all signs point toward worn, damaged or improperly installed pistons rings.

Silicone pieces found in the filter media can be identified by their rubbery appearance and sometimes by a grey, orange or black color. These particles may have come from silicone-based sealants and gaskets. If oil leaks can be tracked to areas using silicone- based sealants and gaskets, it’s likely that pieces of those sealants and gaskets have made their way through the engine and into the oil filter.

Filtering the Info
In some cases, elements found trapped in the oil filter can point you in the right direction when attempting to diagnose an issue with your car. Having the right tools to carry out this simple analysis can be extremely helpful to gain more insight to the condition of your engine. Additionally, catching an issue early on might allow you to address the problem before it turns into a bigger deal.
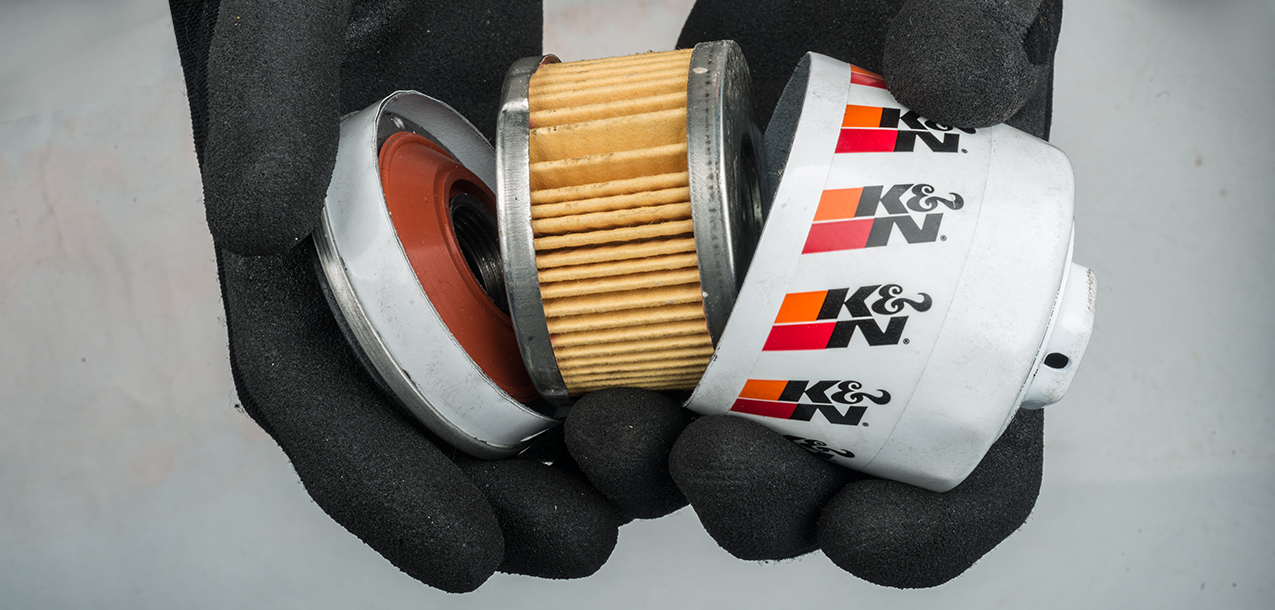
 With the right tools for the job, you can gain access to the inside of your oil filter which can reveal critical information on the condition of your engine.