
It’s going to happen. No matter how hard you try to avoid it, there’s going to be an incident that causes a paint chip on your vehicle. It can happen in your garage, at the track, in a parking lot…anywhere. Recently our GT-R received a nasty chip on the edge of its door while visiting a fabrication shop. After a flash of rage and a five-minute cool-down session, it was time to come up with a solution.
Text and Photos by Michael Ferrara
DSPORT Online Content
Step #1: Assess the damage
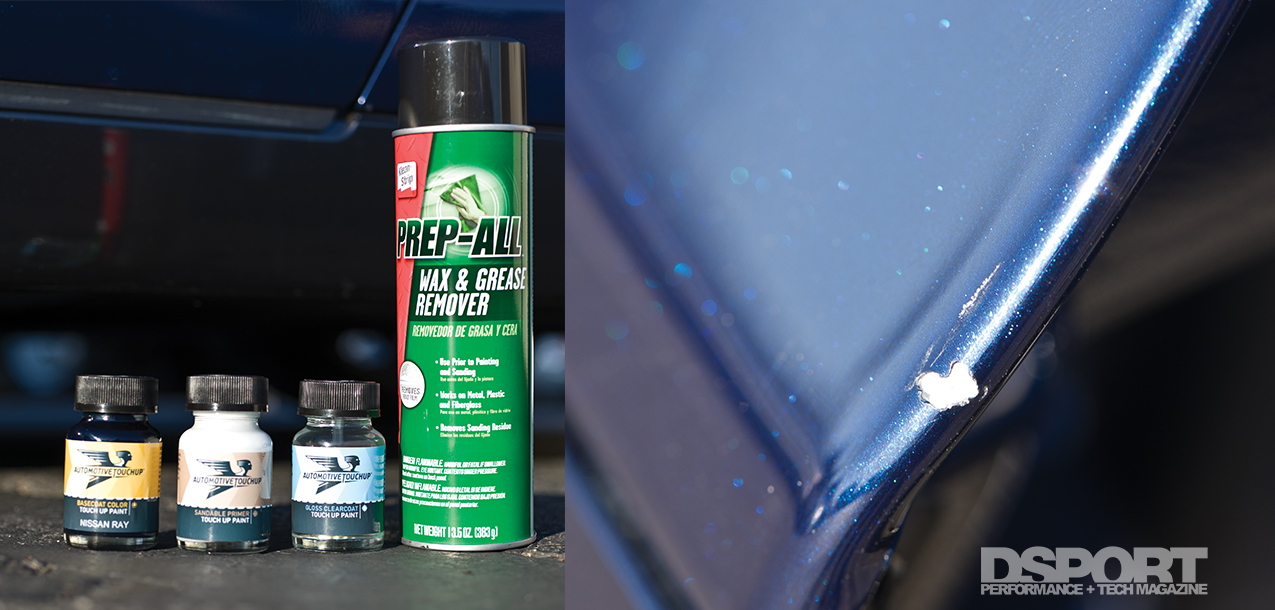
A chip or scratch can be categorized into one of four stages of severity. A Stage-1 chip or scratch would have only affected the clear coat. This is usually identifiable by the chip or scratch taking on a white color (of course, it’s hard to tell on a white car; so just don’t buy white cars). Stage-2 damage shows peneration past the clear-coat layer into the base coat. If the chip has white edges with the base coat color in the center, it’s a stage-2 condition. In the case of the paint chip on the GT-R, the gray primer coat was visible on the affected area. This qualifies the damage as a stage-3 chip. Had bare metal been visible we would have had stage-4 damage.

Step #2: Order the Touch Up Product
 After determining the stage of the damage, you can then properly order the correct touch up product. If there is a stage-1 scratch or chip, simply order the gloss clearcoat touch up paint for the vehicle. If the damage is stage-2, you need to order the basecoat touch-up paint in addition to the gloss clearcoat touch-up paint for the vehicle. If the damage is stage-3, you will need to order sandable touch-up primer in addition to the basecoat touch-up paint and gloss clearcoat touch-up paint for the vehicle. As for stage-4 damage when the metal is visible, it’s extremely important to make the repair as quickly as possible before rust or oxidation forms on the metal. If rust does form, you’re going to need to sand the area before priming. Depending on the size of the repair and the severity of the rust formation, a professional repair may be in order.
For our repair, we sourced our product through AutomotiveTouchUp. They offer touch up paint in bottles, aerosol cans and paint pens. We’re not fans of pens because they limit what can be used to apply the paint. You’re stuck with the application in the pen which may be too large or too small for your repair. Aerosol spray paint cans can be a good solution for larger area repairs, but again, you’ll be stuck with a single applicator. The old-fashioned touch-up paints in a bottle are our personal favorite. These allow the use of any applicator (toothpick, matchstick, brush and more) and they tend to have the longest shelf life.
We ordered a 2-ounce bottle of the primer (SANDABLE PRIMER), basecoat (NISSAN RAY) and clearcoat (GLOSS CLEARCOAT), that was recommended based on the factory paint code from the vehicle. We also sourced a can of PREP-ALL Wax & Grease Remover.

Step #3: Prep the area
For a stage-1, -2 or -3 repair, the prep of the area is very simple. Park the vehicle out of direct sunlight. Clean the area with a dishwashing soap that strips the wax from the affected area (Joy, Dawn, etc…) and water. Once the area is dry, use a grease & wax remover with a new microfiber towel. Rub over the repair area a few times using more grease & wax remover and a new portion of the microfiber towel. Now it’s ready for primer (stage-3 repair), base coat (stage-2-repair) or clear coat (stage-1-repair) application.
For a stage-4 repair that shows no signs of rust, the above procedure is adequate. However if rust is present, the area must be cleaned as above and then sanded with 180-grit paper until all of the rust is removed. Failure to clean the area first with soapy water and wax and grease remover will simply place wax into the metal. This will cause a bonding issue with the primer.

Step #4: (Stage-3 repairs only)
You can build up the low area in the chip or scratch with the primer. Depending on the size of the chip, use a toothpick, matchstick or small brush to put the primer in the low area. Do not overfill the repair area with primer as you will need to leave room for a layer of basecoat color and clearcoat. Putting too much primer in the chip will cause your repair to be higher that the surround area. Always build the primer in thin coats. Follow the manufacturer’s directions for time between coats. In our case, a 10- minute wait between primer coats was recommended. If you need to sand the primer, wait at least 30 minutes and then use 600-grit wet paper to wet sand the primer. After sanding with the 600 grit, the area will be ready for basecoat.

Step #4B: (Stage-3 or Stage-2 repairs only)
Simple stage-2 repairs will just need a dab of top coat in the chip area to make sure there is even coverage before the clear coat is applied. However, there may be some repairs that require a blending of the paint into the surrounding area unaffected by the damage. For these repairs, wait 30-minutes after applying the top coat. Then sand the repair site with 600 grit. The surrounding area should be feather edged with 1500-grit wet sand paper. The repair area should then receive its final coat of basecoat touch-up paint. After 30 minutes of drying, the area is ready for the clear coat.
 Step #5: Clearcoat
Apply 2-3 coats of clearcoat using a light dabbing motion waiting 10-20 minutes in between each coat. Be gentle with the applicator because you do not want to disturb the undercoats. The clear coat will be dry to the touch in two hours. Wait 24 hours for the clear coat to fully dry.
Step #6: Rub a Dub Dub
With the repair completely dry, you can go over the area with a rubbing compound to remove 1500-grit scratches. This will restore the gloss to the blend area sanded down around the repair area.

The Bottom Line
While it sucks to get that scratch, nick or chip, you can feel a lot better about it knowing there’s a simple solution. While we haven’t had time to hit our repair with rubbing compound yet, we did complete the repair right after we noticed the damage. This can help to avoid more serious paint issues in the future and keep more money in your pocket.