
In the ongoing saga of KA vs SR, there has been both progress and setbacks as Jeren and Richard continue their builds. Here is the latest news from both camps as they move closer to the final competition.
Text and Photos by Arnold Eugenio and Richard Fong
Project SR20 Update
In the last visit with the SR20, the increased displacement, cylinder head work and camshafts put more power under the curve and earlier in the RPM range. However, peak power was limited, as the upper limits of the TOMEI POWERED 8446 turbocharger had been reached. To attain greater peak power levels, a larger turbocharger was in order.
Parts List
Vibrant Performance U- bent stainless steel and aluminum piping formed the new downpipe and intercooler piping, respectively. VanJen clamps ensure a positive seal at each of the intercooler pipe joints. Design Craft Fabrication crafted the new piping for a perfect fit.
Turbosmart’s Race Port Blow-off Valve and Hyper- Gate45 external wastegate were redesigned for 2011. Both feature V band clamp connection as well as a locking collar that makes servicing the valves easier. The Hyper-Gate45 fits 44mm V band joints for easy installation.
Heat management is important for keeping under-hood temperatures in check and to maintain exhaust gas velocity. The manifold and turbine housing received Swain Tech’s White Lightning Ceramic Thermal Barrier Coating before being shrouded with DEI’s Titanium wrap and Titanium Turbo Shield.


GTX Power
 Garrett’s latest performance turbocharger series, the GTX, features a lightweight aluminum compressor wheel CNC milled from a forged billet of aluminum. Garrett states that this design delivers a 10-percent gain in flow and pressure ratio compared to its GT-series equivalent. Garrett’s GTX3076R turbocharger was selected as the spec turbo for the KA24 vs. SR20 competition. The billet compressor wheel features a 76.6mm major diameter and 58mm inducer. The compressor housing relies upon a ported shroud for surge resistance. The 60mm turbine wheel is enclosed by a 0.82 A/R turbine housing featuring a V-band outlet.
 The Garrett GTX3076R turbocharger features a billet aluminum compressor wheel that the company states will deliver an increase of 10-percent in flow and pressure ratio compared to its GT-series cousin. A variety of turbine housing options are available with or without a V band connection.
Making The Connection
Garrett engineers recommend a -4AN oil feed line with a 0.035-inch restrictor for their ball-bearing center cartridge. Ball-bearing turbochargers do not require as much oil to be delivered and would suffer premature failure and oil leakage if too much oil is delivered. A -10AN oil drain line and -6AN water feed lines complete the turbocharger’s cooling and lubrication system.
Checking Temps
 The exhaust manifold and turbine housing were sent to Swain Tech Coatings to receive its White Lightning ceramic Thermal Barrier Coating. Swain Tech states that its White Lightning coating reduces radiant heat by anywhere from 35-to-55 percent. This reduction in irradiated heat maintains exhaust gas velocity in the pipes and improves scavenging. To further contain the underhood temperatures, Design Engineering Inc.’s Titanium exhaust wrap covers each exhaust runner, the downpipe and dump tube. A Titanium Turbo Shield covers the turbine housing, leaving no exhaust component without insulation.
Fabrication By Design
 A top-mount exhaust manifold was sourced to properly fit the larger GTX3076R turbocharger. This particular stainless-steel manifold, manufactured by a company that is no longer in business, features a laser- cut flange and equal-length tubular runners. The top-mount location required a new downpipe and new intercooler piping. Vibrant Performance provided V-band clamps with flanges, 3-inch stainless-steel, mandrel-bent U-bends and 2-inch stainless-steel U-bends for the new downpipe. In addition, 3-inch aluminum U-bends and Vibrant’s VanJen clamps were provided for the new intercooler plumbing. The Silvia was brought to Design Craft Fabrication where fabricators Gary Castillo, Len Higa and Ben Schwartz fashioned the downpipe to fit within the confines of the engine bay. A Turbosmart Hyper-Gate45 external wastegate plumbed back into the exhaust regulates boost pressure. Plumbing the wastegate dump tube back into the exhaust ensures accurate tuning at the dyno, especially when the tuner needs to be able to listen for knocking. Vibrant’s VanJen Clamping System features O-ring seals and the flexibility to deflect up to 12-degrees to accommodate misalignment, vibration and engine movement in the new intercooler piping. Capable of holding up to 110 psi, these aluminum clamps eliminate the worry of hose couplers coming undone. Bungs for the intake air temperature sensor and the water/methanol injection nozzle were welded in, along with a tube for the idle air control module.
 Boost N’ Blow (Off)

The spec manifold relies on an external wastegate so we chose Turbosmart’s Hyper-Gate45 as the spec wastegate for the competition. In addition, a Turbosmart Race Port serves as the spec blow-off valve. Both the Hyper-Gate45 and Race Port feature V-band clamp connections, compact chassis designs and end-user serviceability.
Raising the Bar
After fabrication, the Silvia was dropped off at Drift Speed to be tuned by Koji Arai. Initially, the new turbocharger yielded 413 horsepower at 1.0 Bar (14.55 psi), similar to the previous setup at 1.3 Bar (18.9 psi). Next, the water/methanol injection system was activated starting at 1.0 Bar and peak power numbers were targeted. With boost increased to 1.6 Bar (23.3 psi), the new turbo system output 528.1 horsepower at 7,000 RPM while torque jumped from 360.2 lb-ft to 466.2 lb-ft at 5,200 RPM. Koji noted that the 1,200 cc/min RC Engineering injectors reached a 90-percent duty cycle during tuning and the fuel pressure would begin to fluctuate. Koji comments, “In our experience, the S15 fuel supply lines leaving the tank are smaller than those found on the S14. Fortunately, the S14 supply lines can be installed on the S15 fuel tank to remedy the situation. However, since some of the lines are difficult to reach, the fuel tank and rear sub frame must be dropped in order to make the conversion.” Since 1,200 cc/min injectors can usually support horsepower levels in excess of 700, it is likely that the supply issue is the reason for the injectors nearing their maximum capability prematurely.
 Peak power increased from 408 to 528, a gain of 29 percent.
 Peak torque also improved by 29 percent, going from 360 to 466 lb-ft.
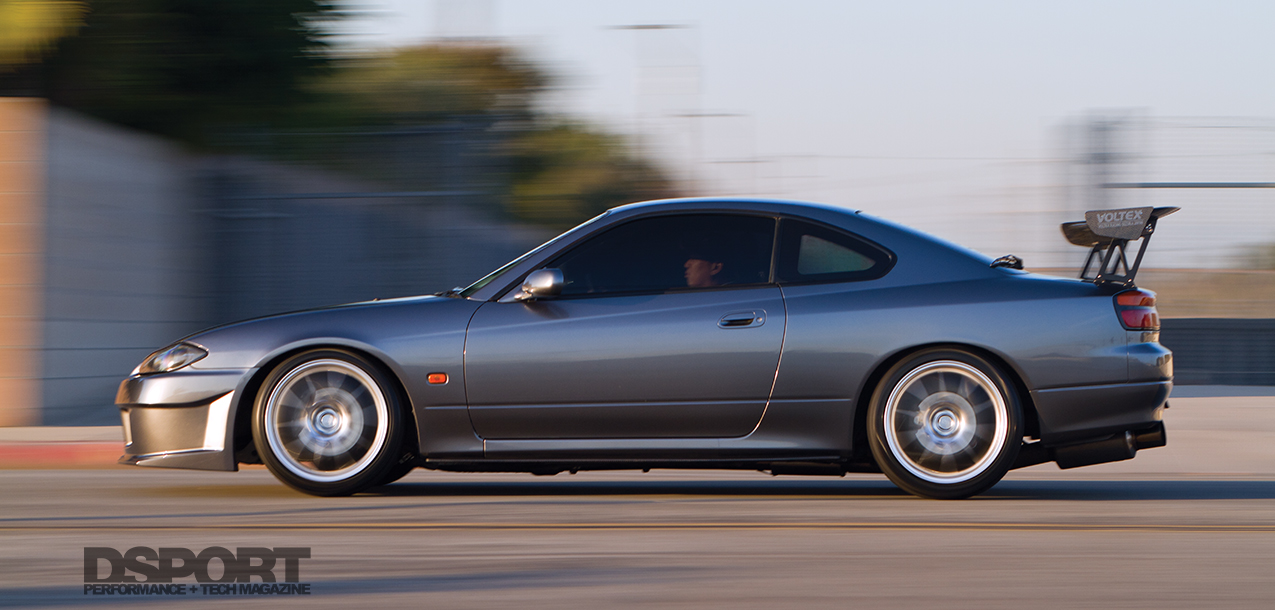
Pumped Up Kicks
The Silvia’s rolling stock was due for an update, so we turned to Enkei for a solution. The Enkei PF01 wheels looked like a good fit for our needs. Manufactured in Japan by way of Enkei’s proprietary MAT technology, the lightweight and strong PF01s were ordered in an 18×9.5-inch offering at all four corners for a “square” set up. The plan is to continue running Toyo Tires in a 265/35R18 tire size. We are currently running PROXES R1R tires, but we might change to a different tire in the Toyo product line if the terms of the battle allow for softer rubber. Having extra rubber at the front will improve the Silvia’s handling manners, especially at the track.

Looks To Match The Power
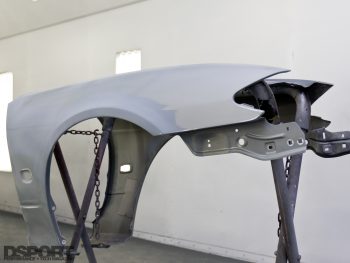
As the D’Garage Silvia edged closer to its end- goal, it was time to get the exterior up to par with a proper paint job. The Silvia took a trip to Griffin Wurxs in Anaheim, California to be repaired and painted by Sean Griffin, a veteran of the automotive paint world and Glasurit-certified painter.
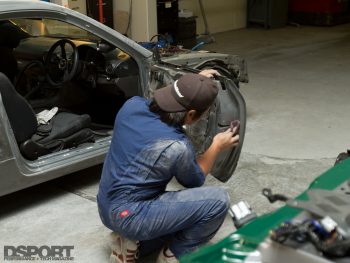
Prepping For Paint
The art and science of painting a car is labor intensive and tedious. The Silvia was cleaned then treated with a wax and grease removing solvent. Next, the existing dents were repaired and smoothed. The repaired areas were then feathered with the current layer of paint before being spot primed. The body was then blocked with 320-grit sandpaper followed by a 600-grit wet sandpaper. A DA sander with a soft interface pad and 320-grit sandpaper expedited the preparation of other components undamaged in the Silvia’s previous accident. The 320-grit was followed by a 600-grit wet sand for optimal adhesion. Because of the color change, the Silvia’s jambs and door edges were also prepared for painting using 3M red scuff pads.

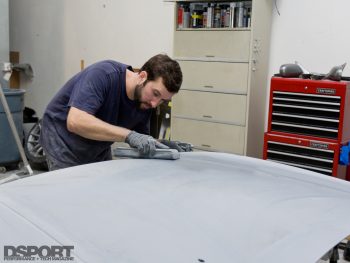
Get Into The Booth
With the body repaired and sanded smooth, the shell was again wiped down to avoid contaminants from entering the paint booth. Lifting tape was used to pull the edges of the front and rear windshield seals away from the body since these two windows would not be removed prior to painting. The remaining windows were removed or adequately protected from overspray. The fenders, hood and trunk lid were painted
separately as some of these components were being replaced.

Final cleaning before spraying involved three steps. The first was to wipe down all of the surfaces with a solvent cleaner to remove any oils and finger prints that might still be on the body. Then an antistatic water based cleaner was used to remove water-based contaminants left by the solvent cleaner. Finally, Sean employed a tack cloth to remove any contaminants from the prepped surfaces just before spraying.

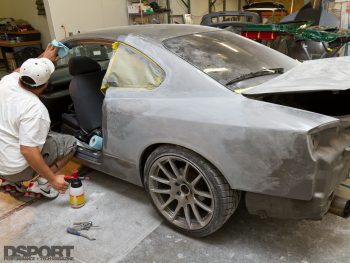
First, a BASF RM Epoxy Sealer was applied to protect any exposed metal. After two hours drying time, Sean mixed and sprayed Glasurit’s 90 Line waterborne basecoat in an R35 GT-R Gunmetal hue. Two full coats (with proper flash time between them) were laid down followed by a half coat for an even distribution of the metallic. Once allowed to properly flash, three coats of Glasurit 923-200 clear coat were applied.

The factory ABS rear bumper and the fiberglass NISMO R-tune front bumper are naturally going to be subject to flexing and abrasions. Therefore, during the clear coating process a special elastifying agent was added to resist stone chipping and cracking.

Finishing Touch
After 24 hours of curing time, the painted surfaces were color sanded and buffed. The color sanding process starts with a 1000-grit wet sandpaper, followed by a 1500- grit and 2000-grit wet sandpaper. The last sand is performed with a machine 3000 grit wet sandpaper to make the polishing process easier. Sean used Meguiar’s Professional Series Mirror Glaze 105 Ultra-cut polishing compound before finishing with Meguiar’s Mirror Glaze 205 Ultra Finishing Polish. Once completed, the body was rolled outside for a wash to remove the petroleum polishing residue from the surface. Once dried, the Silvia was reassembled and readied for street use, where it sits now.


 The fabrication, tuning and paint were completed just in time for Project Silvia to make its public debut at the 2011 SEMA Show in Las Vegas. Enkei came through with a set of PF01 wheels and Toyo supplied a set of PROXES T1 Sport tires in time for the show.